Her Grace, Mary, Queen of Scots
...bids you come and have a gander at these...
The blurb:
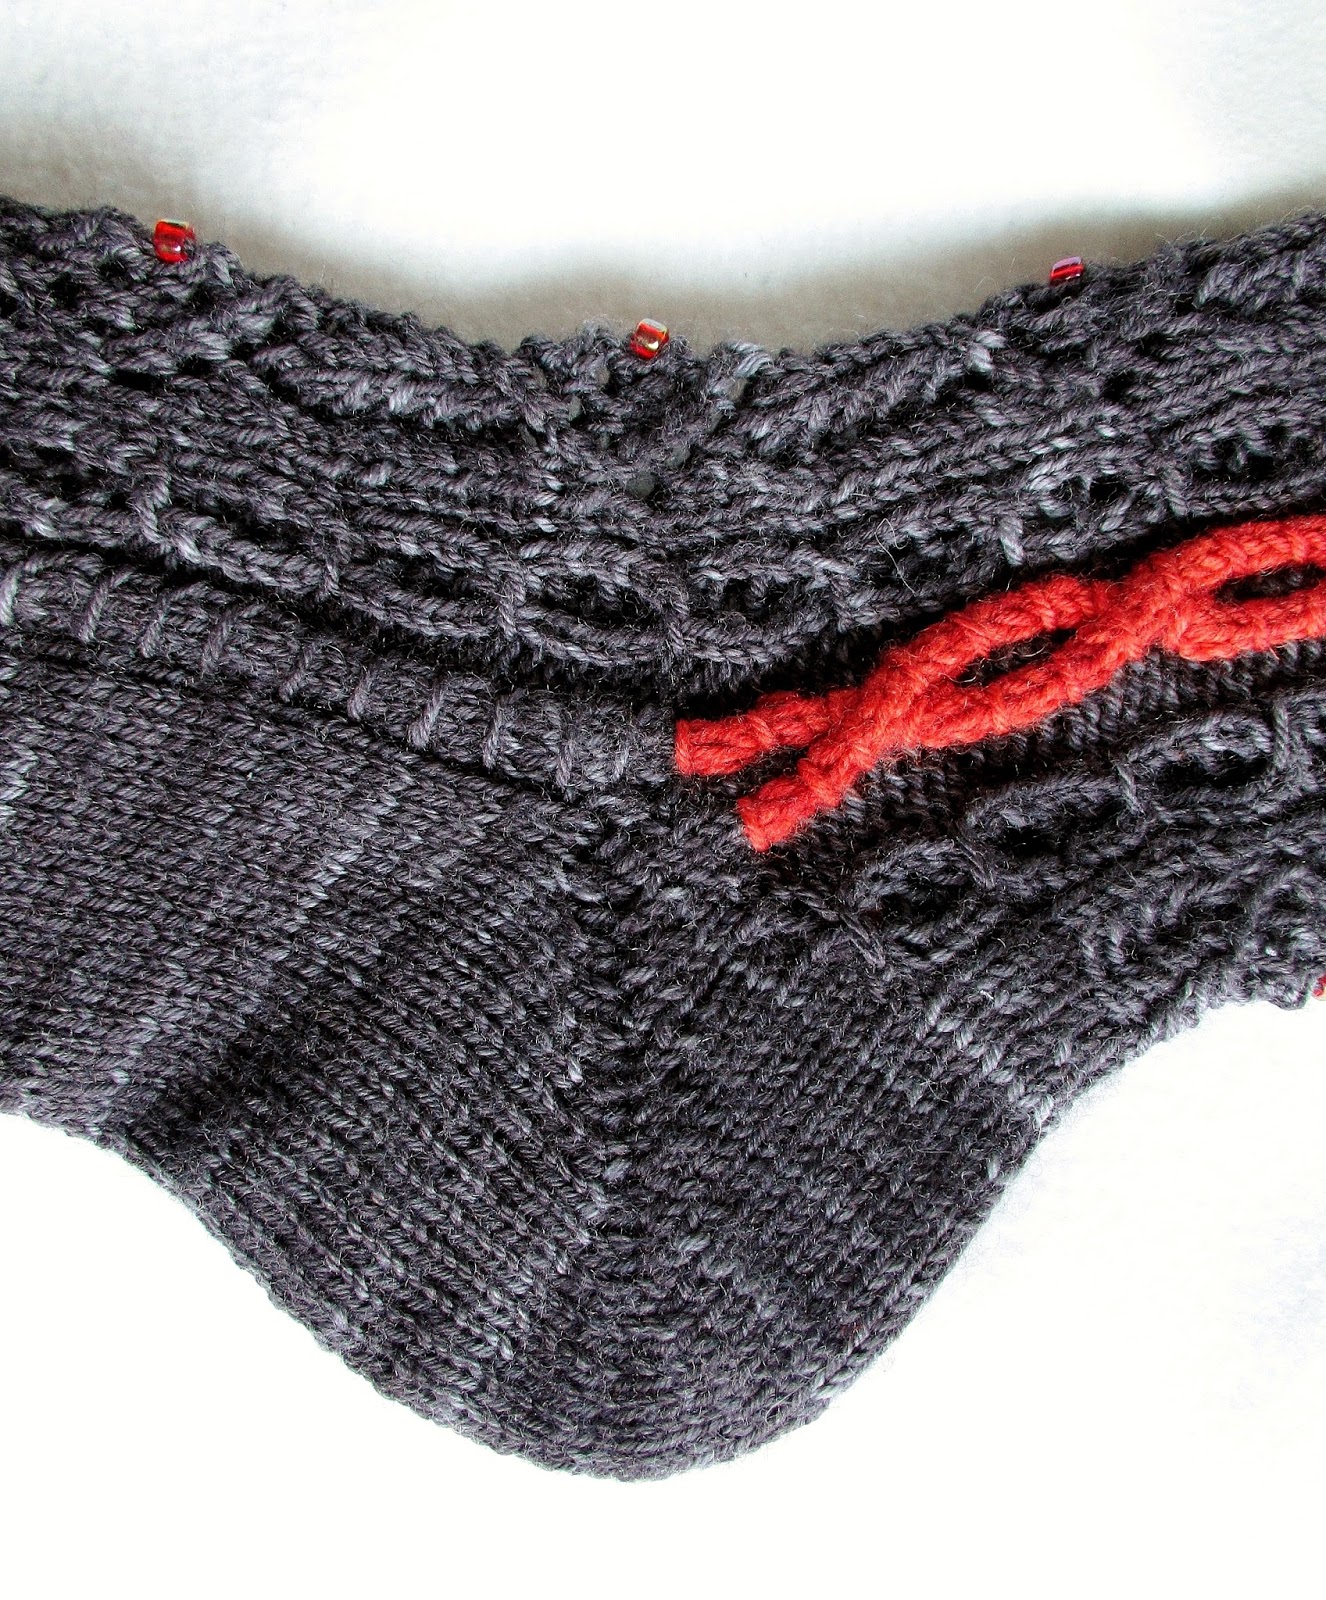
The main pattern is worked in one colour, and for this version I chose a cream and silver yarn as a nod towards the opulent gown in the Clouet portrait, but my second version used an onyx yarn to represent the colour Mary was known to wear continuously after the death of the first husband. The chains or red that I chose at the side are a not to the (possibly apocryphal) tale that before her beheading, Mary disrobed her customary black to reveal a crimson under-gown - the colour of Catholic martyrdom.
 |
| mary, queen of socks, by yours truly |
Mary, Queen of Socks is a companion pattern to Gloriana (my socks inspired by Elizabeth I) and is another design in the series inspired by costume and clothing through the ages. The main beaded motif is an adaptation of embroidered embellishments seen on the gown of a 12- or 13-year-old Mary in a sketch by Clouet c.1555, and the cabled eyelet pattern running parallel to the main motif is a nod towards the famous six ropes of black pearls given to Mary for the occasion of her first marriage (pearls that were coveted, then owned by Elizabeth I).This is a toe-up, beaded, lace, and cable sock, with a Fish Lips Kiss Heel, and comes in four sizes from small to XL.
 |
| black version: the knitting goddess UK 4-ply sock 75/25 in 'onyx' and holiday yarns flocksock sock in 'bloody mary mix' white version: ice yarns freddo aplpaca lux in 'silver white' |
The centrepiece of the sock design is adapted from the gold embroidery found on the 12- or 13-year-old Mary's dress in a portrait by Couet c.1555,


and is flanked by two rows of stylised pearls representing the famous six strings of black pearls given to Mary on her wedding day to Francois, dauphin of France, by Catherine de Medici. These are described as "six cordons of large pearls, strung as paternosters [...] These are for the most part like black muscades (grapes)." You can see one of these strings in a portrait after Clouet (below), and if you want to see all six worn together, check out Elizabeth I in the Armada portrait!

The cables represent something a little more sinister - bindings for captivity, and in my onyx version, showing the colour of the under-dress Mary is reported to have worn under the black satin dress she wore for her execution - crimson red, the colour of blood and Catholic martyrdom.


You have the option to add a bead at the mid-point of the cross in the square part of the main motif, but if you prefer to keep the eyelet pattern complete throughout, or only add beads to the leg of the sock, there's an option for that in the pattern.


Well. You can see above that in the white version (above) I started the 'pearl' pattern at the first crossover immediately after the heel (on the same row as the front) but didn't start the main motif pattern until I hit the first round of the internal beaded square. In fact, I did the start of this motif in exactly the same way I started the toe, just with the correct amount of stitches either side! But how and where you start is completely up to you, as long as you're working the same round as the front!

I chose to start the colour-work section at the first bind stitch after the heel, and using 2 balls of the contrasting colour, one for each side, I slowly worked the chain cable. The key is to keep the yarn taut, but not too taut. I have one tester who decided to work the entire bind section from the toe to the cuff in a contrasting colour, with a couple of changes to stitch placement on the sole (details on the link to the project HERE), and the effect is also pretty special.
And that's pretty much it. The cuff is more of a recipe than an actual set of instructions; basically you continue the knit stitches as twisted knit stitches, the purls and yo's as purls, and the bind cable as the rest of the sock, but without the cables. Simple!

For the white version I stopped after row 10 and continued:
p1, (ktbl, p2) x2, B3 (or k3 depending on which round you're on), p2, B3/k3, p2, ktbl, p2, ktbl, p1, ktbl x2, (p1, ktbl) x3, p1, ktbl x2. and for the onyx version I stopped on round 24 and continued:
p1, (ktbl, p2) x2, (k3/B3, p2) x2, ktbl, p2, ktbl, (p1, ktbl) x4.
for about an inch and half or so, binding off with a nice stretchy stitch - I used Jeny's Suprisingly Stretchy Bind Off, but feel free to use your favourite! Of course, you are free to stop the leg for the cuff any place you want, but if you want to keep the wider bind stitches apart, then I'd suggest stopping either between rounds 8 to 12, or rounds 20 to 24. You'll see what I mean if you buy the pattern!


Go on, you know you want to!


With thanks to my Intrepid Ravelry Testers™ ChocolateKate, confiance, crochestist, KnittingNightElf, knotginaj, Mimmyknits, MooseJean, Naehall, Purple TX, renater59, sharpei4kris, SitNKnit, Skalman277, and TigerSharkknits.


1 comments:
The flat design is the next step in this process. This is where you can create the pattern for the main part of the sock before you move the design mockup to the template. Each part of the file allows you to focus your attention on the various pieces of the sock to get the right design for it. sock label template
Post a Comment